I'm sure that you've all kinda figured out, but I've taken off this week to relax and enjoy after all the Christmas madness! Adam has been so much fun, it's been easy to forgot to blog, clean the house, make dinner, you name it !
I hope that the end of 2010 and the beginning of 2011 brings all the happiness that you deserve to you! I hope that you party like an animal, whether it be a lion or a chipmunk! I hope that 2011 brings inspirations and the time to complete them!
Please be safe and happy!
Andrea
(I'll check in on Monday with fantastic projects... I hope!)


Friday, December 31, 2010
Wednesday, December 22, 2010
Printer Tray Presents and more...
Hello again,
Sorry, I know my blogging is becoming increasingly erratic. I can't guarantee that it'll get much better before or even right after Christmas, but I still have a lot to share so hang on tight!
I wanted to share a present that I created for my girlfriend - I love it! I used Cosmo Cricket's Circa paper line, which is awesome and I must get my hands on more!! I made a copy of a picture of her Mom from when she was younger and I made copies of new pictures of my friend and her family. I love the way this turned out, I love the collage feeling of the whole thing! The only thing that I'd do differently is that I would add more 3-D aspects, I would have something resting on the actual wood dividers and I'd try to use more metal and fabric. I really want to make more of these, so we'll see what my next one looks like.


I also wanted to share a quick and easy idea of wrapping. I made this fun little Christmas Artist Trading Card for a class a few months back and was thinking that I'd save it and turn it into a tag for Christmas. When I was wrapping gifts I grabbed the card and decided that it would look really cute glued to a plain kraft gift bag so I tried it and I loved it!!


Andrea
Monday, December 20, 2010
PIllows, pillows, PILLOWS!!
I finished my 1st batch of Christmas presents! Yay! We had our annual cookie day yesterday where me and 3 of my fantastic girlfriends make a serious amount of cookies! Well, I didn't do much, I've been pretty tired, but the rest of them put me to shame! Anyways, we exchange our homemade presents on cookie day so I finished mine up on Saturday morning, 1 whole day before the deadline - whoop-de-doo! And I was pretty proud of them, to be honest! Today, or maybe tomorrow, I'm going to start on my next round, which is only 2, maybe 3, maybe 4 (depending on the time situation), presents. My last batch was 6 homemade presents.
So, the project that I'm showing today are Silhouette Pillows. Now, you can use your Silhouette SD computer software to actually cut out the silhouette of someone once you have imported the picture or you can do it the old fashion way - by hand - like I did! I was very sneaky and had each of the kids come over (I used husbands, texts, uncles, whatever!) where I took a few pictures of their profiles - I suggest taking more than one just in case! Then, print the picture on cardstock and cut it out, then trace it onto Silhouettes Heat Transfer Material and cut that out. Once you have that done, iron it onto the fabric of your choice. I then took fabric that I thought would match their home decor and did a strip all the way around the fabric square with the silhouette on it. Then sew on the backing in another coordinating fabric, stuff with pillow and hand sew shut! Very fun, very personal and, I think, super cool!


Only 4 days left till Christmas morning!
Andrea
So, the project that I'm showing today are Silhouette Pillows. Now, you can use your Silhouette SD computer software to actually cut out the silhouette of someone once you have imported the picture or you can do it the old fashion way - by hand - like I did! I was very sneaky and had each of the kids come over (I used husbands, texts, uncles, whatever!) where I took a few pictures of their profiles - I suggest taking more than one just in case! Then, print the picture on cardstock and cut it out, then trace it onto Silhouettes Heat Transfer Material and cut that out. Once you have that done, iron it onto the fabric of your choice. I then took fabric that I thought would match their home decor and did a strip all the way around the fabric square with the silhouette on it. Then sew on the backing in another coordinating fabric, stuff with pillow and hand sew shut! Very fun, very personal and, I think, super cool!

Princess Maya with her pillow... isn't she just as cute in black and white as in person!

Ruan and Mia, love how Mia's silhouette is just as dainty as she is! And I love the hair in Ryan's silhouette!

Here's Jen, Anna and Aaron... it was a challenge just to get Aaron to sit still long enough for this pic!
Only 4 days left till Christmas morning!
Andrea
Friday, December 17, 2010
Christmas Presents have taken over my world!
Do you remember a post... it was a while back... where I said that I was on my game with present making? We'll, I was crazy! I have no game! I'm hoping to find game some time soon! I need to have 9 presents made by Sunday... I have 4 of them done! And, you might be thinking, "But you have today and Saturday, you're golden", but that's where you're wrong because we're having my Mother-in-Laws 60th birthday party here on Saturday! And I have a cold, but whatever, massive snot production coincides with massive craftiness for me!


So, wish me luck while you look at another fun book that I created using LifeStyle Crafts Winter Wishes! I used the same pattern as the other book that I made a few weeks back, but I used a super cute skating penguin die from Cottage Cuts for the cover. I used all Basic Grey's Jovial line for the book, I know it's kinda lazy to use only 1 paper line per project but it helps when you have a lot to do, it takes the guess work out! This book is 6 x 6 inches, it has the fan folded binding that the pockets are glued to and a spine cover which helps hold the book together and gives it a nice finished look!


See you all soon!
Andrea
Tuesday, December 14, 2010
100 Posts and Nap Time News
I just heard Adam's door open, so this blog post might be cut short! And I don't even care that he only played in his room instead of napping because he was so cute to hear! He was singing his own version of "The Grinch" and "Frosty the Snowman" and he was telling his "friends" (aka - stuffed animals) that he is going to his cousin's house tonight and what they would play... so stink'in adorable! We'll be paying around 5:30 tonight but for now, it was just the sweetest thing.
So, yesterday was my 100th post! Whoopie! I kinda wish that I would've planned it a little better and done something huge but... I'll do something big for post 200!
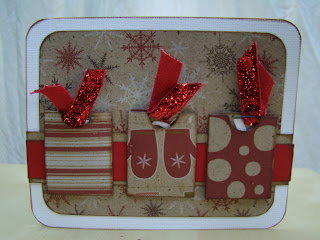
Here's a fun card that I made using, what else? Cosmo Cricket's Mitten Weather. I love this card, it was a last minute change for a class and it just fell together so nicely. I think that the fun, ruffled red/white gingham ribbon was the "wow" factor in the card. I also love the Santa stamp from Stamp'in up - love the vintage feel of it and I used Copic markers to color it in. I only have 2 colors, red and blue, but I figure that I'll get more as I need them - they're kind of an investment! Anyways - I also put Flower Soft diamond white on his beard and hat, just for fun. I am going to add a saying, probably just "Ho Ho Ho" before I mail it! Hope you enjoy!

Andrea
So, yesterday was my 100th post! Whoopie! I kinda wish that I would've planned it a little better and done something huge but... I'll do something big for post 200!
Here's a fun card that I made using, what else? Cosmo Cricket's Mitten Weather. I love this card, it was a last minute change for a class and it just fell together so nicely. I think that the fun, ruffled red/white gingham ribbon was the "wow" factor in the card. I also love the Santa stamp from Stamp'in up - love the vintage feel of it and I used Copic markers to color it in. I only have 2 colors, red and blue, but I figure that I'll get more as I need them - they're kind of an investment! Anyways - I also put Flower Soft diamond white on his beard and hat, just for fun. I am going to add a saying, probably just "Ho Ho Ho" before I mail it! Hope you enjoy!

Andrea
Monday, December 13, 2010
Fa La La Book
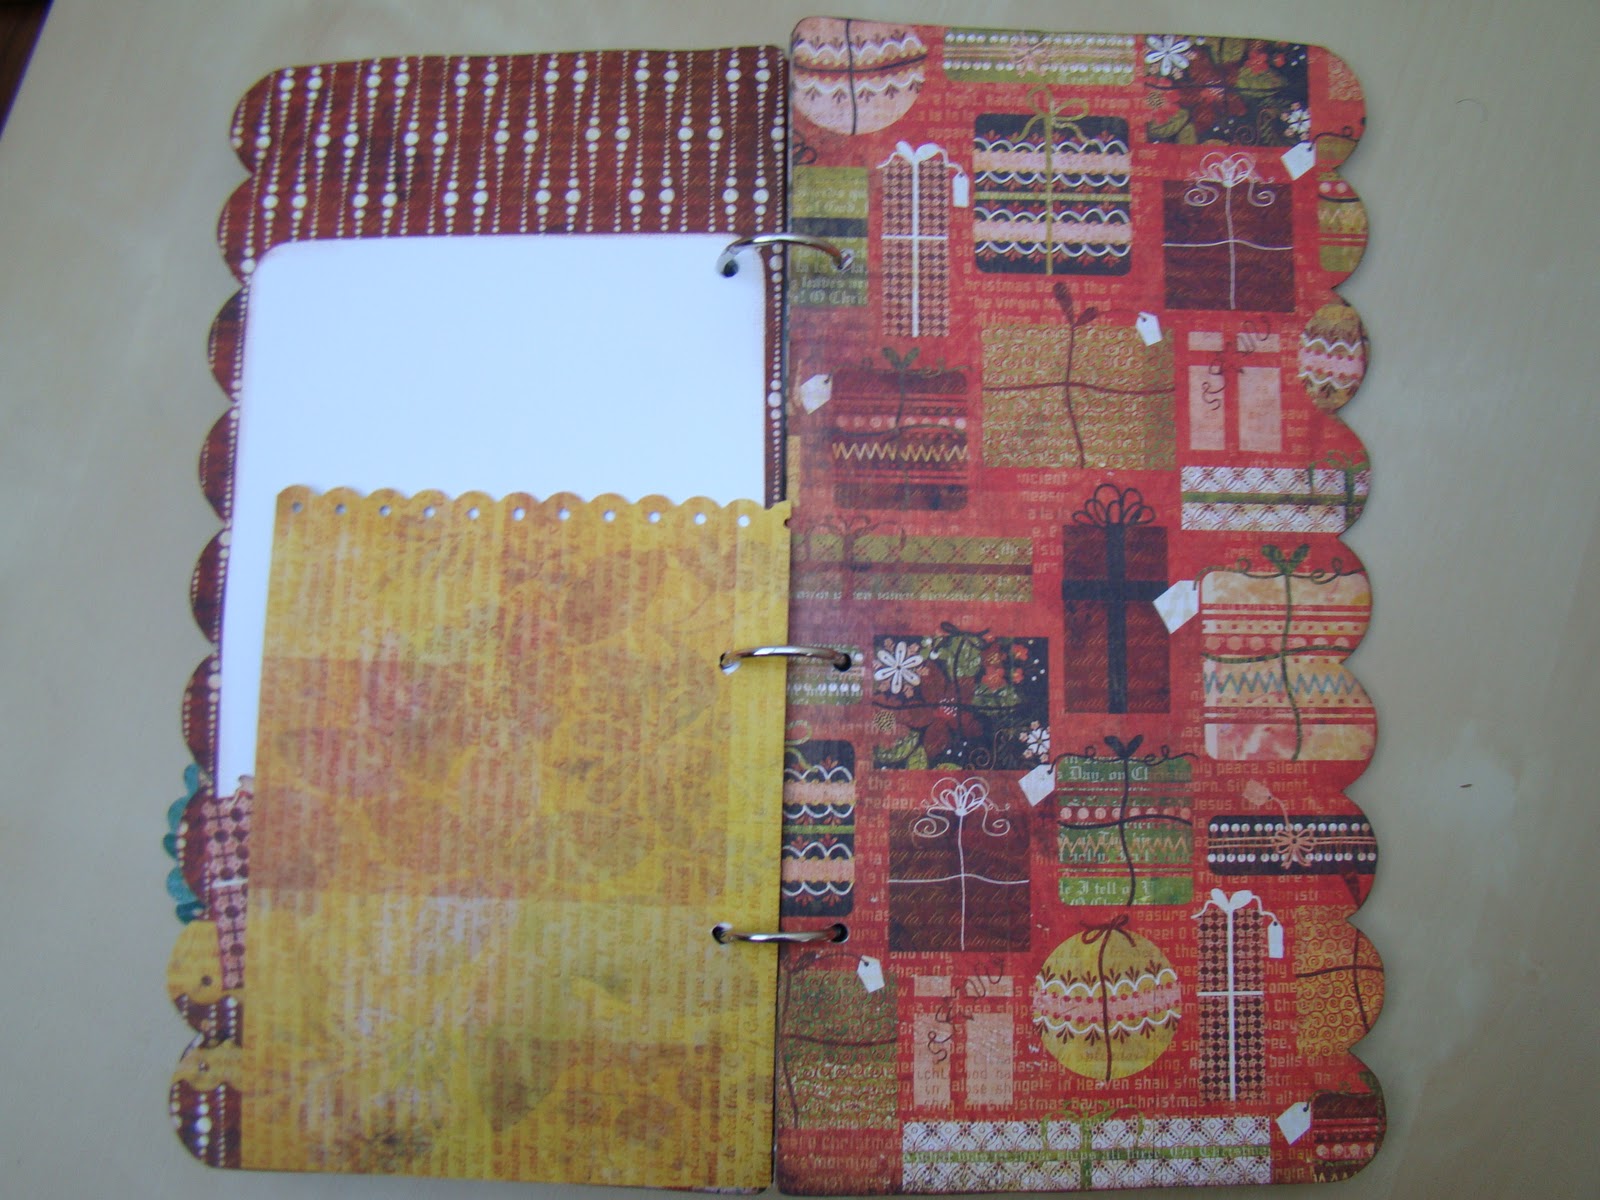
Here's an album that I made using all Basic Grey's Jovial paper line. I used the Element Sticker and the Chipboard stickers that coordinated with the same line. I also used a few embossing folders because I love how much they add for so little work!! My goal was to make 25 pages for 25 Days of Christmas but I think I scrapped in with 23 pages... oh well. I can always add when I'm feeling inspired again!


Remember, you can always enhance your book with a fun pocket and page, and if you made some of your pages different sizes and shapes then I think it really helps stretch your supplies and keep your interest! The fun part about using this paper was that since the paper was so cute, I didn't really need a ton of work for my pages, I was able to keep them pretty simple which made the whole project easier!
Only 12 days till Christmas! Are you ready??
Andrea
Friday, December 10, 2010
Wish Coupon Book
Here is a fun idea for a project using Life Style Crafts Winter Wishes Gift Set.


I'm planning/hoping to make a few of these for friends to hold their Holiday pictures, but I know that they're also a cool way to give someone gift cards or even for a child to make a coupon book for a parent or grandparent.

The "Book" is 6x6. The accordion fold that the pockets are glues to is 5 x 6 in. with a fold every inch. I think that if you included different size pockets that would be fun, add a cute message or picture in the smaller ones and a gift card in the larger one... whatever you do, you'll knock the stockings off of the recipient!
Have fun!
Andrea
Thursday, December 9, 2010
Tags!
Here are two more tags. I actually have a lot to share so I figured, why drag it out???


The first one is cut from the Silhouette SD, I then took a scrap of Christmas paper from WeR's line and glued it, then wrapped some red/white bakers twine around the tag and then take another scrap of patterned ledger paper and stamped the heart/noel stamp in red. I love the combo of teal and red - Pretty pretty. The stamp is from the Unity Cosmo Cricket Mitten Weather set.

The second tag is pretty simple. I took a 3x4 in black piece and made that my tag base. I stamped a music stanza (October Afternoon Thrift Shoppe Stamp Set) on a piece of kraft solid and adhered that. I also stamped a Cosmo Cricket Snowman (same set as above) on a piece of white paper and cut it out AND onto the kraft paper. I then placed the cut out white snowman over the one stamped onto the kraft so you could see the arms w/o having to cut ridiculously thin arms!!! I added a scarf and a little broom that I had left over from Halloween! Add a little bit of Melissa Frances Glass Glitter and you have a fun and vintage-y (in my opinion) tag for a package! Love this little guy!
Happy Holiday crafting, crafters!!!
Andrea
Wednesday, December 8, 2010
Vinyl Joy
Hello!
I've been racking my brains on something creative to do for our Christmas Cards this year. Ever since Adam was born, I've tried my hardest to think of cute and different ideas for any thing that we send in the mail... his birth announcement looked like an invoice, our moving postcard had him popping out of boxes with our new address... last Christmas I lite up a string of lights and let him play with them and shot it in the dusk... but this year I was stumped! I saw a picture in Jan. issue of Creating Keepsakes where they took a picture and used photoshop to write straight onto the picture. I really liked the effect, but I knew that I wouldn't have the time to take a cute picture and then play with it and then create the cards and then mail them!!! People would be lucky if they got them by the 4th of July! So, I put my thinking hat on and decided that I could get a similar effect if I used my Silhouette and cut out letters, placed them on the wall and then had Adam pose next to them. This is what I ended up with. The picture isn't perfect, the glare was hard to control and my camera wasn't exactly level... but I figure, it goes with the theme of our world! Not perfect, a little off level but pretty darn cute!

EnJOY!
Andrea
(Here's a picture of how I used the same idea, vinyl letters, to finish my mantle. We love The Beatles soo I choose a quote that fit our family!)
Tuesday, December 7, 2010
Christmas Tags
The tree is up, well, both trees are up - and the living room and playroom are decorated... only have the dining room left... which makes me feel very relaxed about all of my Christmas gifts that I have yet to start... but am in the motion of starting! I keep telling myself, "Self, it's only the 7th of December and you only have 10 maybe 11 gifts to create - no problem!" This is my problem every year... my self is a procrastinator!
But, what I didn't procrastinate on is my gift tags! I actually worked up a bunch of samples for a class but knew that I'd be keeping them for my own presents - talk about double duty!! I'm going to post tags off and on for the next 2 weeks; I thought about doing a 25 Tags of Christmas but then we all know how my 30 Cards: 30 Days went... so, I thought I'd show a few here, a few there... in between other projects!

Here's a super easy tag that I cut from my Silhouette SD using JilliBean paper - which I love! I also used the Unity Cosmo Cricket Mitten Weather Stamp for the saying "It's hard to be this good" which I feel sums it up! I cut 2 stockings from the LifeStyle Crafts Christmas release and used a little bit of Bakers Twine. I then covered everything on the white part of the tag with diamond glaze EXCEPT for the twine and the stocking, I wanted dimension. Easy. I think that stamps are the key to tags, they can make everything so easy and you can use scraps from your Holiday cards or projects.
See you soon!
Andi
Sunday, December 5, 2010
Pillow is the name of my game
I was watching HGTV the other night - it was their decorating special - and one of the tips that they recommended was adding festive pillows to your decor to bring the Christmas feeling all throughout your home! So, here's another pillow that I created using my Silhouette SD, Heat Transfer Flocked Material and seasonal fabric. You can follow my directions from the "Believe" pillow that I made and shared a few weeks back. I already gave this pillow to my Mother-in-Law who loves Snowmen and my son!!!

I'll start sharing tags this week so stay tuned!!!
Andrea

I'll start sharing tags this week so stay tuned!!!
Andrea
Friday, December 3, 2010
Advent Calendar
Hello!
I'm sorry it's been so long, Thanksgiving has come and gone and we are heading (with lightening fast speed!) into the crazy/fun Holiday season! Our house is full of snot, hot tea, chicken soup and blankies... but we're still happy that Christmas is around the corner! So, to start it off, I thought I'd show you an Advent calendar that I created using LifeStyle Crafts Winter Wishes gift set.


I used Making Memories Noel paper (I love the cool vintage feel) and I was able to get 4 pockets from 1 sheet of 12x12 paper - so you'll need 7 sheets of paper, plus more for the cards that you put in the pockets (I haven't made mine yet...). Then I just gathered a bunch of materials that I had laying around, little flowers, trim, bells... and some punches to use on my scraps and started diecutting and gluing! I made the letters with my Silhouette, that way I could do different sizes and fonts (although I ended up sticking to the same font, Georgia!). When I was done, I took 2 rulers (I cut one down) and a few screw eyes and attached the two rulers with ribbon through the screw eyes. Attach the pockets on with binder clips (I used misc office ones and Tim Holtz Binder Clips) - you can glue them on if you don't want to worry about them falling off, but this will make it harder to store. I hope you enjoy, I had a great time making this project, it was fun and easy, just the way I like my projects!
See you soon! I have tags and pillows ready to show!
Andrea
Friday, November 19, 2010
Festive Pillow
Happy Friday!
I love Friday... I'm not sure why since I typically teach classes on the weekends so it's more like the start of my continuous work week... must just be residual excitement from school days of long ago...
I want to show you a pillow that I created using my Silhouette SD and Flocked Heat Transfer Material (also from Silhouette). It's so easy, you don't need to be a good sewer, you just need to know how to turn on your iron and count!

I cut out a jingle bell and the word "Believe" from the red heat transfer material. I REMEMBERED (the 2nd time!) to mirror my word so that once I ironed it on it would read correctly. Once I cut these beauties out, I peeled off the negative space and then ironed them both onto a 12x12 in. piece of duck cloth (using the instructions on box). I then cut 4 -2x14 in. pieces of coordinating material and sewed them around the edge of my pillow - I just wanted to add a little something. I then cut a square (the same size of my front panel) from fabric and sewed all of my pieces together! Add a few buttons, stuff with a pillow and there you go! Super cute, super easy and I think I've spilled the beans for everyone's Christmas presents this year!
I have a lot more projects to share, so stay tuned!
Andrea
Tuesday, November 16, 2010
New Release Tuesday!!!
Ahhh, it's such a relief that I can finally post some pictures of projects that I've been making using LifeStyle Crafts "Winter Wishes" gift set, which I think it totally FAB-U-LOUS!!! Here are a few simple but CUTE gift card holders.


You can get 3 cards from 2 pieces of 12x12 paper. Not too shabby, huh? Just slide a gift card or photo into the front pocket and mail it off! I love that you can do this for any occasion, it really is a versatile set. I also love the font that comes with it, very fun and festive.
So, I know that I haven't been posting regularly, but the Holiday's are super busy in the crafting world (which I'm sure you know!), so please keep checking back and I promise to do my best to NOT let my blog wait til the 1st of the year!!! I really do have some super fun projects that I've been working on that I can't wait to share! I've been using a lot of the Silhouette SD lately, I'll be at Pages from the Heart (Monrovia) on Thursday night for a fun night of demo's and chit chat! Please call Kathy and join us!
See you back SOMETIME this week!
Andrea
Sunday, November 7, 2010
There's a party in my Mouth! Party Mix
Hello -
Well, at a class on Saturday we made goodie bags filled with an easy and fun "party mix" for all the ladies in the class! We made super simple bag toppers (cut a 4x4 in square from patterned paper - fold in half, use a border punch on one edge, then we cut "Merry Christmas" using the Silhouette and glued them onto the square,) that we staple to platic baggies with munch in them. Easy easy! BUT, since everyone enjoyed the party mix so much I decided to post the recipe. This makes a TON, so make sure that if you make it that you have plenty of people to hand it out to, otherwise you'll have cavities galore!!
12 Cups Popped Popcorn (remove unpopped kernels!) OR 5 Cups Corn Chex
3 Cups Frosted Cherrios (I like to use generic fruit loops for a more colorful mix!)
1.5 Cups peanuts or pecans (I use cocktail peanuts)
1 Lg package M&M's (you can get them in a variety of colors to match your theme or season!)
1 10 oz pkg mini-twist pretzels
3 pkg white chocolate chips
3 tbsp vegetable oil
Line a few cookie sheets with wax paper or spray with pam (you'll need 4 or 5 cookie sheets)
Mix the first 5 ingredients together in an EXTRA LARGE bowl - I've had to use 2 bowls at times. I mix by hand, it just seems easier.
Melt the chocolate chips and oil in the microwave, I do them for a minute in the beginning, then go down to 15 sec intervals as they start to melt. Poor over mix. Stir with spoon.
Spread onto cookie sheets IMMEDIATELY!! You can put them in fridge for the chocolate to set up faster or you can leave them out in a cool room for about 2 hours. Store in air-tight container.
That's it! Very easy but makes a ton! And everyone who tries it can't get enough! Anyways, stay tuned! This week I'll be posting a project that I'm creating with the LifeStyle Crafts (formerly QuicKutz) NEW Christmas dies!!! Fun Fun!
Andrea
Monday, November 1, 2010

Wednesday, October 27, 2010
Good Witch or Bad Witch Pencil Can
Hello!
I'm horrible this week with my posts! We've just been too busy having fun - Adam and I have been doing a lot of Halloween stuff this week so my posts have fallen to the wayside! Anyways, here's a fun little project that is super easy and I re-used an aluminum can to do it! Saving Earth one project at a time!
I really loved the Cottage witch feet and I really liked the way my card turned out with them, so I used the same design (basically), and made a pencil holder from it. The label and house are from my Silhouette machine, the legs and shoes from Cottage Cutz and the wording I just printed off using my word processor. I used last years Eerie from Basic Grey for the green background. A little button with some bakers twine and here you are! A fun and cute pencil (or candy) holder!


I'll try to do a few more posts this week - I cant guarantee it tho - we're going to Disneyland tomorrow! Can't wait to go on the Haunted Mansion!
Andrea
Saturday, October 23, 2010
Fall Door Hanger
Hello!
Here's a quick project that you can make for any season!!


I took 2 Coasters from Maya Roads and covered them with paper. I used WeR's Maple Grove line. I also used Cottage Cutz basket and apples to decorate my first coaster and my Silhouette to spell out fall. I used a wallet-sized picture of my son for the bottom coaster. Then just wire to connect the two coaster and a little more to hang it with and you're done! Super easy and super fun! This could even be a fun project for a Halloween party for your little guests to make to remember the event by!
See you all soon!
Andi
Here's a quick project that you can make for any season!!

I took 2 Coasters from Maya Roads and covered them with paper. I used WeR's Maple Grove line. I also used Cottage Cutz basket and apples to decorate my first coaster and my Silhouette to spell out fall. I used a wallet-sized picture of my son for the bottom coaster. Then just wire to connect the two coaster and a little more to hang it with and you're done! Super easy and super fun! This could even be a fun project for a Halloween party for your little guests to make to remember the event by!
See you all soon!
Andi
Friday, October 22, 2010
Boo-tiful Wreath
Happy Friday!
I don't know about you, but we're in Halloween countdown at the J House! We have 2 costume Halloween parties tomorrow, 1 Halloween Carnival and the "We're All Mad Here" Mini-Album on Sunday! Luckily, I don't get worn down by Halloween, I just totally enjoy everything about it.
I've been working on my and the Hubs Halloween costumes - my lovely sis-in-law helped me sew up my chaps, Hub's vest and my yarn hair yesterday... can you guess who we're going to be?? Yup, Jesse and Woody to Adams Buzz! I've had to be creative about our costumes since I didn't want to spend a fortune on them, I've done a lot of up-cycling, used a lot of Fabric-Tac (my sewing machine broke the other night) and have taken old shirts that "We never wear anyways..." and ruined them! I mean, added lovely embellishments to! I'll show pics this weekend!


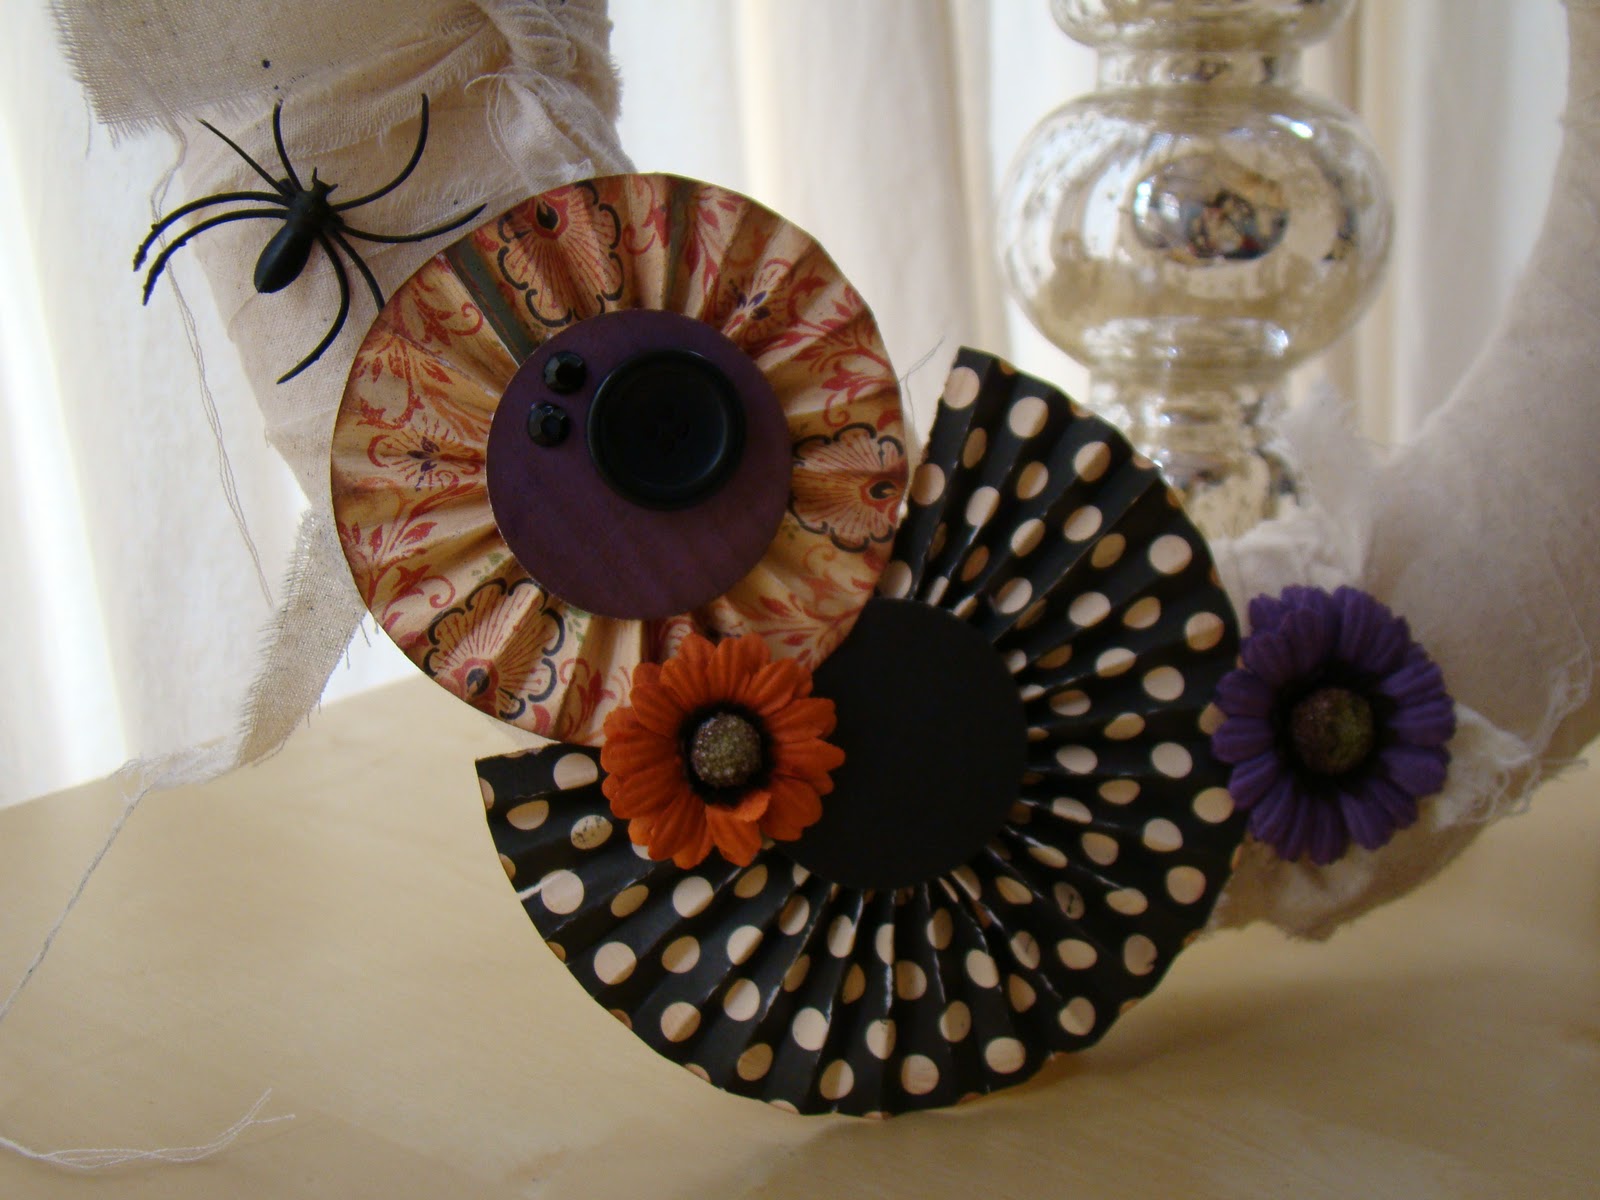
 Okay, but what I actually wanted to talk about it... my Boo-tiful Wreath! I had a lot of fun making this... I took a Styrofoam wreath form and hot glued strips of muslin that I had left over from playroom curtains to it. I made sure to tear the muslin instead of cutting it so that it wouldn't look perfect. I sprayed Tattered Angels Mist in slate and Creme de Chocolate on it just to age it a little. I then made some paper circles (I cannot remember the name of them! ugghh!) that I did a fan fold on and then glued them together at the end. I then adhered them to 2 circles, one on the back and one scalloped one on the front and hot glued them to the wreath. I added some Prima flowers in Halloween colors (love them!) and some buttons, hot glued a couple of plastic spiders and there you go! One boo-tiful wreath to have anywhere you'd like (mine is on our hall-tree, or as Adam calls it, the "hallway").
See you all soon! I'm going to do a post a day till Halloween since I still have a lot of Halloween projects to share!
Andrea
I don't know about you, but we're in Halloween countdown at the J House! We have 2 costume Halloween parties tomorrow, 1 Halloween Carnival and the "We're All Mad Here" Mini-Album on Sunday! Luckily, I don't get worn down by Halloween, I just totally enjoy everything about it.
I've been working on my and the Hubs Halloween costumes - my lovely sis-in-law helped me sew up my chaps, Hub's vest and my yarn hair yesterday... can you guess who we're going to be?? Yup, Jesse and Woody to Adams Buzz! I've had to be creative about our costumes since I didn't want to spend a fortune on them, I've done a lot of up-cycling, used a lot of Fabric-Tac (my sewing machine broke the other night) and have taken old shirts that "We never wear anyways..." and ruined them! I mean, added lovely embellishments to! I'll show pics this weekend!


See you all soon! I'm going to do a post a day till Halloween since I still have a lot of Halloween projects to share!
Andrea
Monday, October 18, 2010
So tired but...must...post...blog...
Hello All!
I am TIRED - but I'm trying desperately to stay awake till the Hub's gets home from watching Jackass 3-D (I know, I know, I'm not even going there...) and I really wanted to do a post tomorrow but I am hoping to take my little man to Disneyland, so, here goes a post that will probably ramble and make little sense. So, enjoy!
Okay, so here's a few Halloween cards that I made LAST year but that I lurve! I won't be a ton of help since I can't remember the names of the paper that I used (I'll make note to look at scraps and find out), but they're such simple but awesome cards!! I luurrrve them - did I already say that?


I also am sharing a beautiful picture of Adam that I took today up at a local Pumpkin Farm - called Soffel Farms - which was tucked away into the hills behind our house - I'd never been there but was enthralled with the beauty of the place. It's been a wet weekend around here and the hills were surrounded by fog and a light mist, the tress were all green and orange and yellow and it was truly magical. I have to say that while living in SoCal has it's advantages (ocean, mountains, Disneyland, outlet malls on every corner) that I lloooonnnngggg for "Seasons". I long for "sweater weather" in Sept, October and November and I pray each year that I'll be able to wear long sleeves on Christmas Day and that a fire in the fireplace will be a necessity instead of ridiculous! So, today was a perfect to pick a pumpkin with my lil' Pumpkin who said things like "That's a great idea. This is just great!" and "What a fun day, thanks Mama" and "This punkin is perfect, we must get it for Daddy". He's 2.5 going on Prince Charming...

Happy Fall, ya'll!
Andrea
Thursday, October 14, 2010
Jury Duty Bribe???
Hello - I have 5 minutes before I have to run out the door for Jury Duty... ucckkk... on my anniversary... double ucckkk! Here's a super simple Halloween project, perfect for any little Ghost or Goblin that you love!!!

 I upcycled a plastic box that held cookies, washed it (of course), then I tore strips of white paper into random thickness and inked the edges with brown distress ink and adhered with Scrappy Glue to the top of my container. I left an opening in the center towards the top and adhered a black rectangle. I then glued down two googly eyes and then put more of my white strips over the edges to make my Mummy come to life!! I stamped BOO (Cosmo Cricket Haunted Stamp Set) in black and went over it with black Stickles. Fill with candy and give to bribe your way out of Jury Duty!! I mean, give to someone special! See you all soon!!
Andrea


Andrea
Thursday, October 7, 2010
We're All Mad Here Album
Hello, Hello!
I wanted to show you my "We're All Mad Here" Hallowe'en in Wonderland Mini Album. I had so much fun making this book - I was very inspired by the paper, I love the old fashioned look of the paper and the colors... some of the colors are so vibrant while others are so dark and murky, it's such a cool combination!

I also experimented with some techniques, I used Crackle Paint, embossing folders, paper flowers, die cuts, paper layering, Stickles... some techniques I've used frequently, other's are ones that I have a new love for!


Some of the Graphic 45 papers had different images on them, almost like a collection of postcards. I really wanted to find a way to utilize the different images because they were all so beautiful, so I cut out what I wanted and put the QK frame around it, but a little kiddi-wampus.


The book itself is cut from chipboard using pages from the AccuCut machine, which I then covered with solid black paper for simplicity. I find it easier to work on a neutral, cohesive background, it takes some of the guess work out of the picture for me.
Anyways, I hope you like this book. I'm offering this book as a Workshop from my home in Redlands on:
October 19th @ 10 am
October 24th @ 11 am
Or you can take the class at Pages from the Heart in Monrovia on:
October 17 from 10 am - 1 pm - cost is $35 per person
Please contact me at raven26105@msn.com for pricing and supply info!
Hope you're feeling crafty today!
I wanted to show you my "We're All Mad Here" Hallowe'en in Wonderland Mini Album. I had so much fun making this book - I was very inspired by the paper, I love the old fashioned look of the paper and the colors... some of the colors are so vibrant while others are so dark and murky, it's such a cool combination!

I also experimented with some techniques, I used Crackle Paint, embossing folders, paper flowers, die cuts, paper layering, Stickles... some techniques I've used frequently, other's are ones that I have a new love for!


Some of the Graphic 45 papers had different images on them, almost like a collection of postcards. I really wanted to find a way to utilize the different images because they were all so beautiful, so I cut out what I wanted and put the QK frame around it, but a little kiddi-wampus.


And last, what would Alice be without the Queen of Hearts? Just an ordinary little girl in a make believe land.


The book itself is cut from chipboard using pages from the AccuCut machine, which I then covered with solid black paper for simplicity. I find it easier to work on a neutral, cohesive background, it takes some of the guess work out of the picture for me.
Anyways, I hope you like this book. I'm offering this book as a Workshop from my home in Redlands on:
October 19th @ 10 am
October 24th @ 11 am
Or you can take the class at Pages from the Heart in Monrovia on:
October 17 from 10 am - 1 pm - cost is $35 per person
Please contact me at raven26105@msn.com for pricing and supply info!
Hope you're feeling crafty today!
Andrea
Subscribe to:
Posts (Atom)