Photobucket Photobucket Photobucket Photobucket Photobucket Photobucket

Tuesday, April 30, 2013

Food Week!!! Skinny Chicken Pesto

Hello!

Good Morning!

Today I'm sharing a Skinny Chicken Pesto Bake recipe from the SkinnyTaste, which may be my new favorite Recipe site for a few reasons...

1.  I've tried a number of her recipes and every single one is delicious.

2.  My little family LOVES all of the recipes!

3.  They're GOOD for you, fresh and low in calorie!

Big A and I have set a new goal for the next year, one which involves a healthy, active lifestyle - but more on that later!  Let's get to eating!


Now, since I cook for a family, I typically double the recipes and freeze enough for another meal.  I haven't played too much with this recipe, we usually have this on top of whole wheat pasta with a side of either asparagus or brussel sprouts.

Skinny Chicken Pesto BakeSkinnytaste.com
Servings: 4 • Size: 1 piece • Old Points: 6 pts • Points+: 6 pts
Calories: 236 • Fat: 11.5 g • Carbs: 2.5 g • Fiber: 0.5 g • Protein: 28.5 g • Sugar: 0 g
Sodium: 491 mg (without salt)

Ingredients:


  • 2 (16 oz total) boneless, skinless chicken breasts
  • salt and fresh pepper to taste
  • 4 tsp Skinny Basil Pesto
  • 1 medium tomatoes, sliced thin
  • 6 tbsp (1.5 oz) shredded reduced fat mozzarella cheese
  • 2 tsp grated parmesan cheese

Directions:

Wash chicken and dry with a paper towel. Slice chicken breast horizontally to create 4 thinner cutlets. Season lightly with salt and fresh pepper.

Preheat the oven to 400° F. Line baking sheet with foil or parchment for easy clean-up.

Place the chicken on prepared baking sheet. Spread 1 tsp of skinny pesto over each piece of chicken.

Bake for 15 minutes or until chicken is no longer pink in center. Remove from oven; top with tomatoes, mozzarella and parmesan cheese. Bake for an additional 3 to 5 minutes or until cheese is melted.

To Grill: Grill chicken over medium flame on both sides until cooked through in the center. Lower flame, top chicken with tomatoes and cheese, and close grill until cheese melts.

Skinny Basil PestoSkinnytaste.com


Servings: 5 Serving Size: 1 tbsp • Old Points: 2 pts • Points+: 2 pts
Calories: 86 • Fat: 8.3 g • Protein: 2.3 g • Carb: 0.8 g • Fiber: 0.3 g • Sugar: 0 g
Sodium: 94 mg (without salt)

Ingredients:
  • 1 cup basil
  • 1 clove garlic
  • 1/4 cup grated parmesan
  • salt & pepper to taste
  • 2 1/2 tbsp olive oil

Directions:
In a food processor pulse basil, garlic, parmesan cheese, salt and pepper until smooth. Slowly add the olive oil while pulsing. Store in a sealed container and refrigerate until ready to use or you can freeze this in Ziploc bags or ice cube trays to use at a later date
 
That's it for today.  Photos and Recipes are courtesy of SkinnyTaste via Pinterest.
Have a yummy day!
Andrea


Monday, April 29, 2013

Food Week!! Chicken Rollatini

Hello!  Good Morning!

We had a little technical glitch last week... we were on vacation and I'd scheduled all of the food posts for last week BUT there was some sort of technical issue (definitely not user issue) so we're starting food week this week with a wonderful, easy and SKINNY Chicken Rollatini recipe!

(Photo courtesy of recipebyphoto.com)
 
Here's the recipe that I found on Skinny Taste via Pinterest...
 
Chicken Rollatini with Spinach alla ParmigianaGina's Weight Watcher Recipes
Servings: 8 • Serving Size: 1 stuffed breast • Old Points: 4 pts • Points+: 5 pts
Calories: 194.7 • Fat: 7 g • Protein: 24.2 g • Carb: 7.2 g • Fiber: 1.5 g

  • 8 thin chicken cutlets, 3 oz each
  • 1/2 cup whole wheat Italian seasoned breadcrumbs
  • 1/4 cup grated parmesan cheese, divided
  • 6 tablespoons egg whites or egg beaters
  • 5 oz frozen spinach, squeezed dry of any liquid
  • 6 tbsp part skim ricotta cheese
  • 6 oz part skim mozzarella (I used Polly-O)
  • olive oil non-stick spray (I use my Misto)
  • 1 cup pomodoro sauce or your favorite marinara sauce
  • salt and pepper to taste

Wash and dry cutlets, season with salt and pepper. Preheat oven to 450°. Lightly spray a baking dish with non-stick spray.

Combine breadcrumbs and 2 tbsp grated cheese in one bowl and 1/4 cup egg beaters or egg whites in another

Shred or finely chop 1.5 oz of mozzarella cheese and combine with remaining grated cheese, spinach (make sure you squeeze it dry), 2 tbsp egg beaters, and ricotta cheese.

Lay chicken cutlets down on a working surface and spread 2 tbsp of spinach-cheese mixture on each cutlet. Loosely roll each one and keep seam side down.

Dip chicken in egg mixture, then in breadcrumbs and place seam side down in a baking dish (no toothpicks needed). Repeat with the remaining chicken. When finished, lightly spray with olive oil.

Bake 25 minutes. Remove from oven, top with sauce then cheese.

Bake until cheese is melted and bubbling, about 3 more minutes. Serve with additional sauce on the side and grated cheese

I made this exact recipe a few times and it is excellent!  The chicken is super moist, there is plenty of flavor and one chicken roll with salad and roasted asparagus satisfied me, I believe my husband had 2 with salad and asparagus and he was good. 

I started mixing it up a little, making small changes that I knew my family would enjoy, so here's a few ideas that you can try...

 - Lay chicken cutlets down on a working surface, take a thin piece of prosciutto ham and lay it on top of the chicken cutlet.  Spread the 2 tbsp of spinach-cheese mixture on each cutlet.  Loosely roll each one and keep seam side down.

- Rinse canned artichoke and pat dry with paper towel.  Get out as much moisture as possible!  Chop finely, then add to the spinach-cheese mixture.  Spread onto chicken cutlets and proceed per recipe.

- Add 2  heaping tbsp minced garlic (we're a stinky breath family) to the cheese-spinach mixture.  Adjust the garlic to suit your taste.  Proceed per recipe.

So that's that!  A fabulous recipe for a delicious dinner.  Tomorrow I'll share another recipe so you can use the remainder cheese up!

Have a good and delicious one!
Andrea

Friday, April 19, 2013

Biggest Loser Pancakes Recipe

Good Morning!

Today I'm kicking off Food Week!  I'm sharing some of my favorite recipes from Pinterest and from my family... so lets get hungry started!

I've been looking for a healthier pancake for me and Lil' A and I think I've finally found one that we BOTH liked!  Trust me, this hasn't been the easier journey!  I've been trying to use more whole foods and less processed foods/ingredients so the few pancakes recipes I've made with this in mind. 

Biggest Loser Pancakes
 
 
Ingredients:

6 egg whites
1 cup rolled oats, dry
1 cup cottage cheese
2 teaspoons sugar
1 teaspoon cinnamon
1 teaspoon vanilla


Instructions:

In a blender, blend all ingredients until smooth. Heat a griddle or large non-stick skillet over medium-low heat. Spray with non-stick cooking spray. For each pancake pour 1/4 cup of batter onto griddle. Flip when they start to bubble. Cook until golden brown. Repeat with remaining batches, spraying the griddle as needed. Makes about 10 pancakes.

Number of Servings: 3

Nutritional Info Per Serving:
181 Calories, 2.7g Fat, 10mg Cholesterol, 361mg Sodium, 20g Carbs, 2.8g Fiber
 
 
My favorite things about this recipe are:
 
Cottage Cheese and Egg White - I felt like Adam and I were both getting a good amount of protein with this delicious guys
 
Rolled Oats  - I think my heart smiled with this recipe!
 
Now, I'm not a huge fan of using my blending/food processor just because I'm lazy and try to avoid extra hand washing, but it was worth it for these guys!
 
They tasted like french toast, had a similar consistency but were a little more gooey in texture.  I thought this might detour Lil' A but we each ate our whole serving (I used sugar free syrup, Lil' A had maple syrup) and I was content until lunch time. 
 
So yummy!
 
I highly recommend these pancakes - if you give them a try, let me know what you think!
 
Have a great day!
Andrea
KPS


Wednesday, April 17, 2013

QK Coffee Sleeve


Good Morning!  Thanks for stopping by!

Today I wanted to share a fun, quick and easy project I made for Page's QK Club project.  QK came out with a fun Drink Sleeve a while back and I've been wanting to use it in a project since I saw it, but it just never fit with the dies I was using... until this month!

I used the following dies:

 
QuicKutz by LifeStyle Crafts Drink Sleeve


QuicKutz by Lifestyle Crafts Glasses
 
QuicKutz by LifeStyle Crafts Label Dies
 
 
And I came up with this...
 
 
I had just had my Lil' A and my Nephew A1 in the car with me and we'd been playing "Eye Spy"... so when I was looking at the dies I had to use, the glasses die reminded me of our game and I couldn't move past it.


So, I was thinking about coffee and saying "I spy with my little brown eye..." in my head when I came up with a few words that I feel when I see my morning cup of joe, like "Happiness", "Calm", "Relaxation"
 
 
I went with "calm" since that fit on my tag the best!  I used bakers twine to tie my tag onto the drink sleeve, I like giving my projects dimension and this was an easy way to accomplish this.
 
That's it!  And don't forget, you can always cut your drink sleeve from felt or fabric!
 
Have a great day!
Andrea

Monday, April 15, 2013

TRUCKS & CARS! Boy's Birthday Party

Good Morning!

Sorry about the delay... it was a stomach bug week around here, which didn't leave a lot of energy for posting! 

We also registered Lil' A for Kindergarten, which is still hard for me to believe.  I'm sure that I sound like a cliche, but it was difficult for me to keep it together.  Big A just smiled at me and tried hard not to roll his eyes, but it was a big moment for me.  I don't know if it's because he's my only, or if it's because we had such a rocky beginning or if I'm just crazy emotional, but I can still remember how it felt to hold him when he was an infant, breathe in his sweet breath or play with his feet so his toes would curl like a monkey... I think about how he started walking - he had been walking holding onto furniture for a while, but once he decided to walk, he didn't fall, he didn't slow down, he just stood up and walked - it's his way, once he makes his mind up, he goes for it.  Kindergarten seemed so so so far away then, and now it's just around the corner and I feel like I'm clutching at days, even the hard days and trying to hold onto them (and him) as tight as I can.

So, with that said, I wanted to share a birthday party that The M's (one of the BFF's) threw for their little boy, who just turned 2.  The Birthday Boy, Ponno, loves cars and trucks so the obvious theme for the party was vehicles!


The cake was perfect.  It was a sheet cake from Sam's club and we just took some Oreos and mashed them up so that it would look like dirt.  We then stuck the little cars on the crushed cookies and added the Monster truck.  I made the Happy Birthday banner with my silhouette.  I sized pennant triangle's and then added the letters to the middle of the triangles so that when my machine cut them out, each triangle had the negative of the letter.  I then made a slightly larger triangle and cut those out of black paper and glued the white triangle with the negative letters to the black triangles - this ensured that the letters would stand out with the black background but kept me from having to glue all of those little, tiny letters!  I then sewed the triangles together to make the banner.  We used glue dots to tie the banner to the skewers (just regular kabob wooden skewers) and stuck the skewers into the cake!  It was a little breezy so that banner got a little tangled, but that's okay - it was still pretty cute!


The set up was super cute.  First, M laid out black plastic tablecloths on all the tables.  They then took white duct tape and tore strips that were laid down the center of the tablecloth to make it look like a road.


Orange plastic cones were taped to the table with checked flags coming out of the tops.  Bright colored bubble containers were wrapped with checkered paper for the kiddos.


Chocolate donuts became spare tires for guests to munch on.  We made the sign with my Silhouette and instead of cutting each piece separately, I just changed the images from a "Cut" image to a "Print" image.  So cute!

  
But, by far, the cutest thing at the party was the Birthday Boy!  Happy Birthday, Ponno!

I LOVE how the M's pulled this party together, how creative and fun it was!  Nothing like a TRUCK and CARS party for a sweet, car enthused little guy...

Have a great day!
Andrea  

Monday, April 8, 2013

Tortellini Sausage Soup

Good Morning!

Thanks for stopping by!

It's been an interesting Spring around here... our weather fluctuates between rain to 80 degrees and windy in the course of a few hours lately - I know, I know, it's called Spring (as my KY friend explained to me), but here in So Cal, well, we don't really do seasons the same way everyone else does!

I'm one of those people who like to prepare dinners to match the weather.  If it's cold, then I want comfort food... when it's hot, I want to BBQ everything or have sandwiches and salads all the time!  So you may be able to see my my consternation over this unpredictable weather!  How can I plan dinner for a Bermuda triangle of weather!  Now that my crazy is out there, it does sound a little silly out loud, but what's a blog if not to put your crazy out there?!

I've been opting for soup a lot lately, I'm a soup lover and I found this fantastic recipe for Tortellini and Sausage soup over on Our Best Bites this winter and we've been having it ever since!  It's super easy to make, super delicious (I've gotten hoards of compliments every time someone new tries it!) and it makes a large batch so you can either have leftovers or feed a large crew!

Tortellini Soup
Photos and Recipe courtesy of Our Best Bites


Tortellini Sausage Soup

3 links Italian sausage (12 ounces)
4 cloves pressed garlic
1 onion, diced
½ c. water
2 15-oz. cans chicken broth
½ c. apple cider (don’t leave this out! I did once and it wasn’t the same…)
1 16-oz. can diced tomatoes
1 8 oz. can tomato sauce
1 c. sliced carrots
1 tsp. dried basil
1 tsp. dried oregano
2 medium zucchini, grated (great way to use your food processor if you have one)
8-10 oz. package cheese tortellini (check the freezer section of your grocery store; if you can find it there, it will almost always be way cheaper than fresh tortellini. Also, Barilla makes a great dry cheese tortellini)
2 Tbsp. dried parsley (yes, that’s two tablespoons)

If you’re using link sausage, remove the casings and crumble into a large soup pot. To remove the casings, you can use a sharp knife to cut a slit down one side of the sausage and then peel back the casing. And just so you know, both Sara and I have tried taking pictures of this method and there is no G-rated way of posting those pictures…

Begin cooking sausage over medium heat, stirring frequently. If your sausage is pretty fatty, you’ll want to drain it when it’s about halfway cooked. Meanwhile, chop onions and garlic

 
and add to the sausage. Continue cooking until onions are translucent and your sausage is cooked. Your house will smell heavenly.
Add tomatoes, tomato sauce, juice, water, chicken broth, carrots, oregano, and basil. Cover and simmer for 1/2 hour. Add parsley and zucchini

 
and simmer for another 15 minutes or so.
Add the tortellini (I used the dried tortellini by Barilla which is less expensive but you can used the fresher, refrigerator if you'd rather) and cook until tender, and then serve with bread and freshly-grated Parmesan.
 
 
And that's that!  It's so yummy, so much delicious flavor and I feel so good about serving it to my family due to the amazing amount of vegetables!  I always use more sausage than they call for because Big A loves it that way... click here for a direct link to the recipe on Our Best Bites!  And if you're not feeling soup, check out their other recipes - I haven't found one that I don't LOVE!
 
Have a great Monday!
Andrea


Thursday, April 4, 2013

A Really "Goo" Time - Cornstarch and Water Goo!

Good Morning!

Thanks for visiting!

If you stopped by last week, you probably saw the Soap Cloud experiment that Lil' A and I did during one of the many "sickie" times... but there's no way we could do a "clean" experiment (it used soap for goodness sake!) without doing a gross, messy experiment that was super cool!

A Really "Goo" Time! 
Cornstarch and Water Slime

Supplies:
Cornstartch
Water
Bowl/Tupperware/Foil Dish

Optional:
Food Coloring
Corn Syrup

Directions:

Put your Mad Lil' Scientist into clothes that you don't mind getting messy... you may want to do the same for you!


Let your Lil' Scientist pour some cornstarch in the dish.  Our container was about 1/2 full so Lil' A dumped in about 1/4 - I wanted some left in case we had to add more!


Now let your Lil' Scientist pour the water in.  I used about 1 cup.  The measurements are exact, but part of the fun is letting your lil' one figure out how to the consistency they want!


Now let your Lil' Scientist mix by hand - don't use a spoon, part of the fun is getting dirty and letting them feel the texture!


Once we got our Goo to the consistency we liked, my Lil' Scientist wanted to change the color so I let him add food coloring and then mix it all in.


I think this was his favorite part.


Here's the thing about food coloring... it'll stain so your Lil' Scientist's hands may be green (or whatever color your goo is!) for a day or so.  Lil' A kind of flipped out about this so we washed his hands a million times in one night and then had him take a l-o-n-g bath the next morning... he was pretty much back to his original color after that!

 
We talked about:
- What did the goo feel like?
- Why did he think it worked?
- What it felt like with more water compared to more corn starch?
- What would happen if he hit it? 
- Can you shape it into a ball? 
- Can you pour it?
 
Here's some of the science in super BASIC terms and without a super explanation!
 
The cornstarch is made up of long chains of atoms - a polymer. These chains can move past each other, but they take some time to do this. If you pour it slowly, it can flow like a liquid. If you try to force things and make the chains slide more quickly than they want to, they get entangled - and the mixture gets firmer. So if you push hard on it, it acts more like a solid.
The real explanation is actually a bit more complicated than this. But the exact workings of mixtures like this is something that is not all that well understood. Folks sometimes get upset when there is no really good answer for things in science, but really that's a good thing - if we already knew everything there was to know, there would be no reason to try new things - and what's the fun in that?
- Source http://littleshop.physics.colorstate.edu

So much fun, easy and cheap!  I think I liked playing with this gooey slime just as much as Lil' A did!

Have a "goo"d day!
Andrea


Tuesday, April 2, 2013

Nautical Flags Quilt...

Good Morning!

Thanks for visiting today!

Today I wanted to share a quilt I made as a gift a friends new baby.  They're a very special couple to us, the Dad is Big A's best friend since they were 5 and his beautiful wife is so sweet, kind and thoughtful that we just love them and their 2 year old little girl, Stella, to pieces!  In fact, you may remember this quilt that I made for Stella a few years back...


It was so much fun, getting to make such a girly quilt!  Using pinks/purples/flowers/butterflies... it doesn't get much more girly than this!  I wanted to make a quilt for the new baby, who's a boy, and the I knew that the room was going to have a nautical theme...

Now, I'm not really a sailor in any way shape or form... I've heard the term "Yar" but that's about it!  So, I turned to my trusty Pinterest for some inspiration!  Here's what I found...


The flags above immediately made me see quilt squares... so I then searched for Nautical Flags in Pinterest and I found these...


and then this...


And something clicked!  I had no idea that the nautical flags corresponded with letters to send messages to other ships... so I thought, why not spell out the baby's name with Nautical flags?

I grabbed a pencil and paper and started drawing out my pattern (I almost always do this on quilts that aren't plain square quilts), then went to the store and grabbed some solid cotton quilting fabrics, washed, dried, ironed them and started cutting the pieces to my quilt squares.  This is where it got a little complicated.

For most of the squares I could break it down into pieces so that it was easy to assembly them.  But a few of them gave me pause... like the "Y" - so I found this on Pinterest...

(source purlbee.com)
 
These are all napkins that have been pieced together - with photo and step by step instructions on how to assemble ever.single.flag! Which is exactly what I needed for some of the more difficult squares!
 

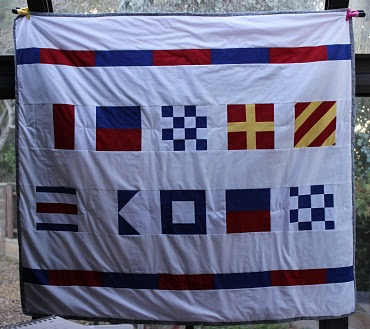
Here's the final quilt!  Can you spell out the baby's name?  


If you said Henry, then you'd be correct!  The top line is his first name, Henry, the bottom is his middle name, Capen.  I couldn't find an ascetically pleasing way to put his last name on the quilt, so I didn't!  That's the pro of designing your own quilt - you get to do what you want!  Big A had some serious qualms about not including the last name, but you can see how much his qualms affected me!


Here's some of the quilt squares up close.  See how you can just piece them like a regular quilt square?


 And the binding and the back.  I love the binding, it looks like little flags to me!
 
That's it!  I didn't end up "quilting" it, I used embroidery floss to tie knots in the middle of the different flags and matting, I really liked the look of the knots, they seemed to fit the nautical theme quite nicely!
 
That's it!  Hope you enjoyed!
Andrea